Much like the bubble screen, which was the focus of Part 1 of this three part series, the tunnel screen is another simple and effective way to get the ball to your home run hitters. This screen is also called the jailbreak screen by many. At Liberty High School, the tunnel screen has been one of our most successful plays for us over the last 2 years.
When to throw:
Like I mentioned in the intro, this is a great play to get your explosive guys touches just to increase the probability of a big play. It can be thrown versus both man and zone coverage. It can be thrown versus a one high safety look, or a two shell look. The tunnel screen, like all screens, is one of the best blitz beaters out there. If you've got a good tunnel screen game, then a defensive coordinator is going to be very careful of when and when not to bring heavy pressure. Like the bubble screen, you want to make sure you have a numbers advantage on the perimeter to the play side.
Blocking:
I've seen the tunnel screen blocked a few different ways. Some teams release their playside tackle, while others don't. Some teams use a count system to identify who they are responsible for, while others just run to an area and pick up the most dangerous man. At Liberty High School, we use a count system to identify who each person will block. We will number from the sideline in to determine who each receiver and offensive linemen will block. The guy directly inside of the receiver catching the ball is responsible for #1, which in most cases will be the corner. The next guy to the inside will be responsible for #2, which is usually the force player. The next guy inside, will be responsible for #3, which is often an inside linebacker. The video below is a clip of Texas Tech's tunnel screen. You will notice that the #2 receiver is responsible for the corner. They chose to not release their tackle to keep the defensive end working up the field, so the guard is responsible for #2. The center is responsible for #3, which is the MIKE backer in this case. However, he follows the back on his fake and takes himself out of the play, so the center continues to climb to the safety.
You can play with the schemes according to how you see fit. For example, if we see that a corner is playing at 12 yards and bailing at the snap we will not count him and send the guy responsible for #1 to a safety or double on the force player.
The offensive line will pass set and count "one one thousand, two one thousand", then release up the field. A key coaching point on this is having them release to where their defender is going to be, not to where he is at the moment. The receivers involved in the blocking, will release up the field two steps to sell a dropback pass and then work to the defenders they are responsible to block. If there is a press or hard cover 2 corner, then a flat release is necessary.
We only release the play side of our offensive line, however some teams choose to release both sides in order to gain a decisive numbers advantage down the field. Texas Tech shows the full release of the offensive line in the video above.
Receiver:
The receiver's steps can be played with to fit the timing of both the quarterback and the blocking. We teach the receiver to take one hard step up the field, and then work back to the quarterback while also gradually working downhill towards the line of scrimmage. You can see this in the video above, but the receiver has to stop his momentum toward the LOS because the ball is thrown to his back shoulder instead of his upfield shoulder. Again, you can play with the angle and the receivers steps to fit your scheme.
Quarterback:
Because this is a delayed screen, you have a lot of freedom in what you want your quarterback and backfield to do before the QB delivers the ball. We've done many different things, to provide a variety of looks and to maximize deception. One of the things we did was have the QB from the gun take 3 steps, while looking the safeties and linebackers to the other side of the field, then delivering the ball on the upfield shoulder of the receiver on the third step. If under center, we would take a 5-step drop and deliver to the receiver on the 5th step. Another thing we've done is fake to the back coming across, which is done in the clip above. Finally, one element we added this past season was a half sprintout or roll to the opposite side and then throwing back to the receiver. This helped to get flow going the other way, before delivering the ball. Like I mentioned above, the timing of the screen allows you a lot of freedom to fit your backfield action into your offensive philosophy. The videos below will show you some variety in of backfield action. One important coaching point for the QB is to throw the ball to the receiver's upfield shoulder so he does not have to slow his momentum to catch the ball. This could be the difference between a 12 yard gain and a huge play. In the video above, if the ball was thrown on the upfield shoulder of the receiver it would have increased the chances of getting by the safety that makes the tackle.
Video:
In the videos below, you will see some different ways to run the tunnel screen.
Please check out Chiefpigskin.com for great videos and articles that will provide you with awesome insight for all aspects of the game.
Sunday, April 25, 2010

Friday, April 16, 2010
Getting The Ball To Your Playmakers On The Perimeter- Part 1- The Bubble Screen
When it comes to getting the ball on the perimeter to your playmakers, the bubble screen is as good as it gets. If you're a coach that charts touches to make sure you're getting your explosive players enough opportunities, this play provides a very easy method of getting the guys you want the football in space. In the past five or so years, this play has become a vital scheme in almost all spread offenses.
When to throw?
The bubble screen is generally thrown to an inside receiver that is lined up off of the ball, when the offense has a numbers advantage to a certain side on the perimeter. This play takes advantage of an outside linebacker that is cheating in the box to gain a numbers advantage in the box for the defense. In the diagram below, the offense considers themselves to have an advantage because of the outside linebacker to the trips side could still be considered an in-box defender.

Blocking:
Generally, the bubble is blocked using an outside zone, reach, or cut technique from the offensive line. The ball is out of the quarterback's hand so quickly that the offensive line's objective should just be to keep the defensive ends from shooting upfield quickly to hinder the throw or keep them from being able to run flat and possibly make a play on the ball. On the perimeter, a simple stalk technique works and the receiver can read the blocks. If it provides better angles, cracks and cross blocking can be done as well. Another way it to reach the outside shoulder of the defenders, turn them inside and have the receiver look to get up the sideline.
Receiver:
There are different techniques used to put the receiver in good position to run after the catch. I will explain the technique that we use at Liberty High School. The slot receiver (whether it is #2, #3, or #4) should align with his inside foot up and the objective on his first step is to gain more depth than width. Depth is important because we want the receiver to be catching the ball while running towards the line of scrimmage. Using the clock analogy, a good step for him would be to take his back foot to the 5 or 7 o'clock mark depending which side he is on. The receivers second step would be parallel to the line of scrimmage, and on his third step he would turn his head and look for the football while working back towards the line of scrimmage at roughly a 45 degree angle (halfway between parallel and perpendicular) to the line of scrimmage. The ball should be to him on his fourth or fifth step. In the videos below, you will see two different techniques used that are also very effective.
Quarterback:
Contrary to the tunnel screen (which will be addressed in the next post) where you see different fakes by the QB and different backfield action, the bubble does not leave a lot of room for creativity by the QB because of the ball needing to be in the hands of the receiver quickly. In the second video below, you will see some fakes to a back to get flow going away from the play and to improve the angles of the blocks. The quarterback should aim to put the football on the 12-18 inches in front of the receiver running towards the line of scrimmage.
Shotgun or Under Center?
The bubble works effectively both under center and in the shotgun. Both provide an advantage the other one does not. Under center, the ball is able to get to and out of the quarterback's hand quicker than in the gun. However, in the gun you are throwing the ball forward to the receiver instead of risking a fumble by throwing it backwards. Not completing the pass simply results in an incomplete pass instead of a backwards lateral, which is a live ball.
Videos:
In the videos below, you will see clips of the bubble screen at both the high school and the college level. Many of the coaching points discussed above can be seen, however these teams do some different things as well.
Thanks to Brethren Christian High School in Huntington Beach, CA for the video of their bubble screen game.
My alma mater, the University of Missouri also utilizes the bubble screen as a big part of their offense. The video below has several clips of their bubble screen in their bowl game vs. Navy.
Further and complete reading on the bubble screen:
Robert E. Lee High School(TX) Bubble Screen Passing Package
Also, don't forget to check out Chiefpigskin.com for tons of useful material to help promote our great profession.
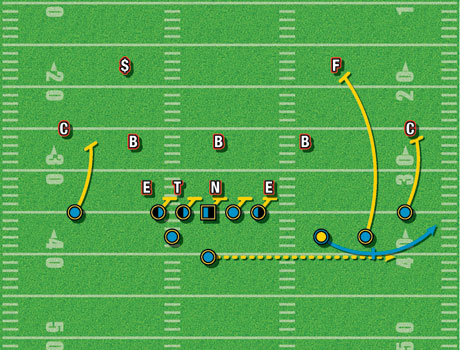
When to throw?
The bubble screen is generally thrown to an inside receiver that is lined up off of the ball, when the offense has a numbers advantage to a certain side on the perimeter. This play takes advantage of an outside linebacker that is cheating in the box to gain a numbers advantage in the box for the defense. In the diagram below, the offense considers themselves to have an advantage because of the outside linebacker to the trips side could still be considered an in-box defender.
Blocking:
Generally, the bubble is blocked using an outside zone, reach, or cut technique from the offensive line. The ball is out of the quarterback's hand so quickly that the offensive line's objective should just be to keep the defensive ends from shooting upfield quickly to hinder the throw or keep them from being able to run flat and possibly make a play on the ball. On the perimeter, a simple stalk technique works and the receiver can read the blocks. If it provides better angles, cracks and cross blocking can be done as well. Another way it to reach the outside shoulder of the defenders, turn them inside and have the receiver look to get up the sideline.
Receiver:
There are different techniques used to put the receiver in good position to run after the catch. I will explain the technique that we use at Liberty High School. The slot receiver (whether it is #2, #3, or #4) should align with his inside foot up and the objective on his first step is to gain more depth than width. Depth is important because we want the receiver to be catching the ball while running towards the line of scrimmage. Using the clock analogy, a good step for him would be to take his back foot to the 5 or 7 o'clock mark depending which side he is on. The receivers second step would be parallel to the line of scrimmage, and on his third step he would turn his head and look for the football while working back towards the line of scrimmage at roughly a 45 degree angle (halfway between parallel and perpendicular) to the line of scrimmage. The ball should be to him on his fourth or fifth step. In the videos below, you will see two different techniques used that are also very effective.
Quarterback:
Contrary to the tunnel screen (which will be addressed in the next post) where you see different fakes by the QB and different backfield action, the bubble does not leave a lot of room for creativity by the QB because of the ball needing to be in the hands of the receiver quickly. In the second video below, you will see some fakes to a back to get flow going away from the play and to improve the angles of the blocks. The quarterback should aim to put the football on the 12-18 inches in front of the receiver running towards the line of scrimmage.
Shotgun or Under Center?
The bubble works effectively both under center and in the shotgun. Both provide an advantage the other one does not. Under center, the ball is able to get to and out of the quarterback's hand quicker than in the gun. However, in the gun you are throwing the ball forward to the receiver instead of risking a fumble by throwing it backwards. Not completing the pass simply results in an incomplete pass instead of a backwards lateral, which is a live ball.
Videos:
In the videos below, you will see clips of the bubble screen at both the high school and the college level. Many of the coaching points discussed above can be seen, however these teams do some different things as well.
Thanks to Brethren Christian High School in Huntington Beach, CA for the video of their bubble screen game.
My alma mater, the University of Missouri also utilizes the bubble screen as a big part of their offense. The video below has several clips of their bubble screen in their bowl game vs. Navy.
Further and complete reading on the bubble screen:
Robert E. Lee High School(TX) Bubble Screen Passing Package
Also, don't forget to check out Chiefpigskin.com for tons of useful material to help promote our great profession.
Sunday, April 11, 2010
"Robber" Coverage- What is it?
This is my first entry as a featured blogger for http://www.chiefpigskin.com. Coach Nate Albaugh has lots of great stuff on his site and I'm glad to be associated with a site such as that dedicated to helping football coaches.
The term "robber" means different things to different coaches. Some coaches play a form of cover 2 robber, while "robber" to others is a man-free scheme designed to spy a QB that is a running threat. In this post, I'm going to focus on cover 2 robber. This defense was designed to stifle the 2-back power run game by getting nine defenders involved in stopping the run. Like all coverages, it has some vulnerability but when defending a 2-back, run heavy offense there is nothing better.
Other advantages of Robber:
1. Able to get FS to both sides of the ball.
2. Able to get control of #2 deep on any vertical routes.
3. Lets inside LB play run because #2 is always controlled vertically to TE side.
4. Able to use 5 DB’s as a base package, which gives better team speed.
5. It looks like cover 3, cover 1, and cover 0 pre-snap.
Cover 2 robber is a form of invert cover 2, with the OLBs/outside safeties being the curl-flat players and the corners playing a deep half like safeties would be in traditional cover 2. The FS is the "robber", in which the coverage is named after. He will serve as the 9th defender in the run game or be a pass defender, depending on his run/pass read. The FS will read the #2 receiver to the "passing strength", if he goes vertical then he will run with him and play a man technique. If #2 runs to the flat, he will then look to "rob" any inside breaking route from #1 such as a curl or dig. If #2 runs an inside breaking route such as a shallow, the FS's eyes will look for a crosser from the other side or look to help with #1. An important key is not disrupt the routes, but to let them develop so the reads can be made with clarity.
If he gets a run read, then he will fly down into his run fit, providing that 9th defender in the run game. Of course, his fit can be any where in the run game that fits the scheme you're employing.
We could spend all day talking about alignment, run fits, coverage responsibilities and reads for the back 7 guys. However, I'm not a defensive coach and it is my intent to just provide a basic overview of this coverage. If you want to learn more, I recommend visiting Coach Huey's great site and interacting with the great resources on there, which is linked on the right side of the page. Also, the legendary Brophy has a blog post which features TCU's defensive playbook that outlines what they're teaching in their cover 2 robber. To access that, click here
The video below is from Virginia Tech's win in 2008 over Georgia Tech. Because of the run heavy triple option philosophy of Georgia Tech, Virginia Tech played a lot of cover 2 robber to get a 9th defender involved in the run game. You'll see the very first snap, the FS gets a run read and makes the tackle for a 2 yard gain. The second snap, the FS gets a pass read with #2 going vertical. There you see him run with #2 in a man technique. Throughout the video, you will see the FS making his reads and being heavily involved as a run game defender.
The term "robber" means different things to different coaches. Some coaches play a form of cover 2 robber, while "robber" to others is a man-free scheme designed to spy a QB that is a running threat. In this post, I'm going to focus on cover 2 robber. This defense was designed to stifle the 2-back power run game by getting nine defenders involved in stopping the run. Like all coverages, it has some vulnerability but when defending a 2-back, run heavy offense there is nothing better.
Other advantages of Robber:
1. Able to get FS to both sides of the ball.
2. Able to get control of #2 deep on any vertical routes.
3. Lets inside LB play run because #2 is always controlled vertically to TE side.
4. Able to use 5 DB’s as a base package, which gives better team speed.
5. It looks like cover 3, cover 1, and cover 0 pre-snap.
Cover 2 robber is a form of invert cover 2, with the OLBs/outside safeties being the curl-flat players and the corners playing a deep half like safeties would be in traditional cover 2. The FS is the "robber", in which the coverage is named after. He will serve as the 9th defender in the run game or be a pass defender, depending on his run/pass read. The FS will read the #2 receiver to the "passing strength", if he goes vertical then he will run with him and play a man technique. If #2 runs to the flat, he will then look to "rob" any inside breaking route from #1 such as a curl or dig. If #2 runs an inside breaking route such as a shallow, the FS's eyes will look for a crosser from the other side or look to help with #1. An important key is not disrupt the routes, but to let them develop so the reads can be made with clarity.
If he gets a run read, then he will fly down into his run fit, providing that 9th defender in the run game. Of course, his fit can be any where in the run game that fits the scheme you're employing.
We could spend all day talking about alignment, run fits, coverage responsibilities and reads for the back 7 guys. However, I'm not a defensive coach and it is my intent to just provide a basic overview of this coverage. If you want to learn more, I recommend visiting Coach Huey's great site and interacting with the great resources on there, which is linked on the right side of the page. Also, the legendary Brophy has a blog post which features TCU's defensive playbook that outlines what they're teaching in their cover 2 robber. To access that, click here
The video below is from Virginia Tech's win in 2008 over Georgia Tech. Because of the run heavy triple option philosophy of Georgia Tech, Virginia Tech played a lot of cover 2 robber to get a 9th defender involved in the run game. You'll see the very first snap, the FS gets a run read and makes the tackle for a 2 yard gain. The second snap, the FS gets a pass read with #2 going vertical. There you see him run with #2 in a man technique. Throughout the video, you will see the FS making his reads and being heavily involved as a run game defender.
Friday, March 26, 2010
Cover 2 and Cover 4
Cover 2 Beaters
The two places to beat cover 2 are in the "windows" anywhere from 16-22 yards on the sideline and in the middle of the field. Because there are only two safeties, the deep-zone responsibility of these defenders is much greater than cover 3 or cover 4.
Smash-the smash (also called "china") concept is a great route vs. traditional cover 2. It provides a vertical stretch or hi-low on the cornerback with the corner-hitch combo. You can make the smash either a key defender read with the corner being the key defender or it can be a high to low progression. It can be run as a 2 or 3 man concept. The following image shows the smash executed on the right side of the formation in a 2 man concept.

Three verticals- this can be a great cover 2 beater because the three vertical routes put tremendous stress on the two deep defenders. The safeties are responsible to cover 53 yards of field and can be taken advantage of. The below image shows a bread and butter play the Indianapolis Colts with both the TE trying to get inside of the safety over the top of them. You can only see half of the field in this image but the horizontal stretch on the safety is evident.

Double slants- arguably the best "quick game" concept vs. cover 2 is the double slant concept. The cover 2 corner is taught to funnel the #1 receiver inside to make the safeties job easier. This allows the leverage we need to throw the slant pattern. The OLB will close down and follow the slant by #2, thus opening up a nice window to get the ball to #1.
Cover 4 Beaters
Since cover 4 employs 4 deep defenders, it is difficult to get anything down the field. Cover 4 is most vulnerable in the flat, curl, and hook zones.
Stick concept- the stick is a 3 man concept that puts a horizontal stretch on the OLB in cover 4. The #1 will run a vertical route to run off the corner, the #2 will run the "stick", and the #3 (either a TE, slot, or RB) will run a arrow/flat. When running the stick, the receiver will work to a depth of 8 yards and then break inside or out, depending on where the coverage is. Texas made a living this year running this concept with Jordan Shipley running the stick.
Double Outs- using the same horizontal stretch as the stick concept, double outs puts a lot of pressure on the OLB as well. With a slightly decreased split, #1 and #2 will run a 4-yard speed out. The #2 receiver, will read the OLB and either continue or stop his movement toward the sideline depending on the movement of the OLB. You can also run this from a trips set, with the #1 receiver running vertical to get the corner to bail.
The two places to beat cover 2 are in the "windows" anywhere from 16-22 yards on the sideline and in the middle of the field. Because there are only two safeties, the deep-zone responsibility of these defenders is much greater than cover 3 or cover 4.
Smash-the smash (also called "china") concept is a great route vs. traditional cover 2. It provides a vertical stretch or hi-low on the cornerback with the corner-hitch combo. You can make the smash either a key defender read with the corner being the key defender or it can be a high to low progression. It can be run as a 2 or 3 man concept. The following image shows the smash executed on the right side of the formation in a 2 man concept.

Three verticals- this can be a great cover 2 beater because the three vertical routes put tremendous stress on the two deep defenders. The safeties are responsible to cover 53 yards of field and can be taken advantage of. The below image shows a bread and butter play the Indianapolis Colts with both the TE trying to get inside of the safety over the top of them. You can only see half of the field in this image but the horizontal stretch on the safety is evident.

Double slants- arguably the best "quick game" concept vs. cover 2 is the double slant concept. The cover 2 corner is taught to funnel the #1 receiver inside to make the safeties job easier. This allows the leverage we need to throw the slant pattern. The OLB will close down and follow the slant by #2, thus opening up a nice window to get the ball to #1.
Cover 4 Beaters
Since cover 4 employs 4 deep defenders, it is difficult to get anything down the field. Cover 4 is most vulnerable in the flat, curl, and hook zones.
Stick concept- the stick is a 3 man concept that puts a horizontal stretch on the OLB in cover 4. The #1 will run a vertical route to run off the corner, the #2 will run the "stick", and the #3 (either a TE, slot, or RB) will run a arrow/flat. When running the stick, the receiver will work to a depth of 8 yards and then break inside or out, depending on where the coverage is. Texas made a living this year running this concept with Jordan Shipley running the stick.
Double Outs- using the same horizontal stretch as the stick concept, double outs puts a lot of pressure on the OLB as well. With a slightly decreased split, #1 and #2 will run a 4-yard speed out. The #2 receiver, will read the OLB and either continue or stop his movement toward the sideline depending on the movement of the OLB. You can also run this from a trips set, with the #1 receiver running vertical to get the corner to bail.
Friday, January 22, 2010
Cover 1 and Cover 3 Beaters
After outlining how to identify all base coverages in my previous two posts, we now need to know how to attack them. Each coverage has both strengths and weaknesses, and defensive coaches will play these coverages according to what they are trying to take away from the offense.
Cover 3 Beaters:
Cover 3 is a very common coverage seen at the high school level. For one reason, it is hard to find corners that can lock up and play a lot of man coverage, or corners physical enough to be run defenders as cover 2 corners.
Four Verticals:
The easiest way to get a defense out of playing cover 3 is to hit them with the ever popular four vertical concept. This concept is exactly what it sounds, four guys running vertical. It provides a horizontal stretch on the FS with the two seams on the inside. The QB is taught to guide the safety with his eyes to one side and then throw to the opposite seam. Georgia Southern's Chris Hatcher explains the four vertical concept a little more in depth. Georgia Southern actually turns the outside receiver routes into 16 yard comebacks, but the same stretch on the free safety is taking place.
Curl-Flat:
The curl-flat concept is a great combination as well to beat cover 3. It puts tremendous pressure on the on the flat defender, who is the OLB in cover 3. The OLB cannot be right in this situation, if he jumps the flat route then the curl window will open up nicely. If he hangs in the curl window, then the flat route will be there for the taking. The video clip below from Madden 10 shows a cover 3 defense, with the OLB jumping the flat route which results in a very wide window to throw the curl.
Quick game concepts:
Because of the bail technique of the corners in cover 3, it is very susceptible to quick game throws such as hitches and speed outs. The OLB has run responsibility as a force defender is cover 3, so the flats are there for the taking.
Cover 1 Beaters
Because cover 1 is a man coverage, looking for and game planning to get the ball your best athlete matched up on a questionable cover guy is a essential to beating cover 1.
Smash or China:
The smash concept is a great concept vs. cover 1 because the FS is in the middle of the field and will have a difficult time getting over the top of the corner route to help out. Defensive coaches teach man technique corners to play inside leverage to take away the inside breaking routes, so that leaves them susceptible to sideline breaking routs such as corners (also known as a flag route) and comebacks. The corners can either be ran by #1 with a reduced split or by a #2 or #3 receiver, depending on the best matchup. You can do what you want with the receivers not running the corner. Against zone, the corner route is usually paired with a hitch in order to high/low the corner to that side. However, a better option vs. man would be to run something to beat man coverage such as a retrace or bench route.
Mesh:
Mesh is a man coverage killer. Using a "rub" concept, the objective is to screen or a pick in order to get someone open vs. man coverage. It is illegal to intentionally pick a man, however the mesh concept is set up to accomplish this legally. Two crossers will run across the field at a depth of 4-6 yards in opposite directions. One crosser will "set the mesh" and the two will slap hands as they continue crossing the field. This ensures there is no space for the defenders chasing the receivers to get through. The result is a play that usually results in one of the meshers springing wide open as he gets into the flat area. Texas Tech has made a lot of their money on the mesh, versus both man and zone. A clip from NCAA 09 demonstrates the mesh concept.
Fade/Out:
Another popular cover 1 beater is the fade/out concept. This concept is where the outside receivers run vertical after getting an outside release. The inside most receiver will then run a short out route, which he will be provided with a lot of run after the catch room because of the vacated defenders going with the outside vertical routes. The 2:25 mark of the video below shows some good footage of the fade/out concept run out of a trips set.
Double Slants:
Double slants are just what is sounds, where the two outside receivers are running slants. The slant is a great man beater. Defenders are taught to not let their man get inside of them, so a good outside release fake is required. Here Ohio State state is shown running the double slant concept vs. Oregon's cover 1 in the Rose Bowl.
These are obviously not the only ways to defeat cover 3 and cover 1, but just a few of the more popular concepts that pose problems for these coverages.
Cover 3 Beaters:
Cover 3 is a very common coverage seen at the high school level. For one reason, it is hard to find corners that can lock up and play a lot of man coverage, or corners physical enough to be run defenders as cover 2 corners.
Four Verticals:
The easiest way to get a defense out of playing cover 3 is to hit them with the ever popular four vertical concept. This concept is exactly what it sounds, four guys running vertical. It provides a horizontal stretch on the FS with the two seams on the inside. The QB is taught to guide the safety with his eyes to one side and then throw to the opposite seam. Georgia Southern's Chris Hatcher explains the four vertical concept a little more in depth. Georgia Southern actually turns the outside receiver routes into 16 yard comebacks, but the same stretch on the free safety is taking place.
Curl-Flat:
The curl-flat concept is a great combination as well to beat cover 3. It puts tremendous pressure on the on the flat defender, who is the OLB in cover 3. The OLB cannot be right in this situation, if he jumps the flat route then the curl window will open up nicely. If he hangs in the curl window, then the flat route will be there for the taking. The video clip below from Madden 10 shows a cover 3 defense, with the OLB jumping the flat route which results in a very wide window to throw the curl.
Quick game concepts:
Because of the bail technique of the corners in cover 3, it is very susceptible to quick game throws such as hitches and speed outs. The OLB has run responsibility as a force defender is cover 3, so the flats are there for the taking.
Cover 1 Beaters
Because cover 1 is a man coverage, looking for and game planning to get the ball your best athlete matched up on a questionable cover guy is a essential to beating cover 1.
Smash or China:
The smash concept is a great concept vs. cover 1 because the FS is in the middle of the field and will have a difficult time getting over the top of the corner route to help out. Defensive coaches teach man technique corners to play inside leverage to take away the inside breaking routes, so that leaves them susceptible to sideline breaking routs such as corners (also known as a flag route) and comebacks. The corners can either be ran by #1 with a reduced split or by a #2 or #3 receiver, depending on the best matchup. You can do what you want with the receivers not running the corner. Against zone, the corner route is usually paired with a hitch in order to high/low the corner to that side. However, a better option vs. man would be to run something to beat man coverage such as a retrace or bench route.
Mesh:
Mesh is a man coverage killer. Using a "rub" concept, the objective is to screen or a pick in order to get someone open vs. man coverage. It is illegal to intentionally pick a man, however the mesh concept is set up to accomplish this legally. Two crossers will run across the field at a depth of 4-6 yards in opposite directions. One crosser will "set the mesh" and the two will slap hands as they continue crossing the field. This ensures there is no space for the defenders chasing the receivers to get through. The result is a play that usually results in one of the meshers springing wide open as he gets into the flat area. Texas Tech has made a lot of their money on the mesh, versus both man and zone. A clip from NCAA 09 demonstrates the mesh concept.
Fade/Out:
Another popular cover 1 beater is the fade/out concept. This concept is where the outside receivers run vertical after getting an outside release. The inside most receiver will then run a short out route, which he will be provided with a lot of run after the catch room because of the vacated defenders going with the outside vertical routes. The 2:25 mark of the video below shows some good footage of the fade/out concept run out of a trips set.
Double Slants:
Double slants are just what is sounds, where the two outside receivers are running slants. The slant is a great man beater. Defenders are taught to not let their man get inside of them, so a good outside release fake is required. Here Ohio State state is shown running the double slant concept vs. Oregon's cover 1 in the Rose Bowl.
These are obviously not the only ways to defeat cover 3 and cover 1, but just a few of the more popular concepts that pose problems for these coverages.
Monday, January 18, 2010
Identifying Coverages Based On Defensive Pre-Snap Alignment- Part II- MOFO Family
The middle of the field open family of coverages consists of 4 base coverages; cover 2, cover 2 man, cover 4, and cover 0. By the "middle of the field open", we mean that there is no safety directly in the middle of the field. There are either two safeties lined up just inside or just outside the hashes, or no deep safeties in the at all.
Cover 2
The following diagram shows the zone responsibilities for each defender in cover 2. As you notice, there are two deep safeties which would cue you that barring a rolled coverage (which I will explain in a future post), this narrows it down to one of three coverages which are: cover 2, cover 2 man, and cover 4.

The quarterback is able to determine that cover 2 is being played by the following defensive cues:
1) 2 deep safeties most aligned 12-14 yards depth, on or just outside the hash
2) corners will be at a depth of less than 4-6 yards with outside leverage on the #1 receiver with their eyes looking in
Some pre-snap shots of cover 2:


Cover 2 man
Cover 2 man still employs two deep safeties much like cover 2. However, it is a man concept underneath and the responsibilities of the safeties change. They are true "free" safeties now which read the QB's eyes and play over the top of all routes. When differentiating cover 2 and cover 2 man, looking at the eyes and leverage of the corners will be the determinate. The alignment from all the defenders is very similar except they will match the splits of the receivers.
Cover 4
Cover 4, also called "quarters" is another MOFO coverage concept. The following diagram shows typical alignment and responsibilities for a cover 4 concept.

Cover 4 is a little bit different beast, that it is a zone coverage that employs a lot of pattern matching and some man concepts. This is how a QB will determine quarters coverage:
1) two deep safeties, usually not quite as deep and aligned more narrow than cover 2 safeties
2) corners will be at a depth of 8-10 yards with outside leverage
Some pre-snap shots of quarters coverage:


Cover 0
Cover 0 is a coverage that employs zero deep safeties and is a popular coverage when offenses are deep in the red zone or other short yardage situations. It is a true man coverage with no safety help over the top. The following diagram outlines cover 0.

How a quarterback will be able to determine cover 0:
1) Safeties will be at a depth of less than 8 yards and lined up over the #2 receiver.
2) Corner depth will be less than 5 yards with inside leverage and eyes on #1 receiver
Pre-snap shots of Cover 0:


Like mentioned in the previous post, defensive coaches will attempt to disguise the coverages as much as possible to cloudy the picture for the QB. For example, lining corners up at a depth of 10 yards to give a cover 4 look and bringing them down at the snap in order to disguise cover 2 is a common move. There are also special coverages that teams are playing nowadays that break these guidelines I have outlined in the last two posts. Those coverages will be broken down in a future post.
A few things to remember and teach your QB to help him to identify coverages successfully pre-snap.
1) Safeties- how many? depth? width?
2) corners- depth? eyes? leverage?
By knowing how to answer these questions correctly and what these answers mean, your QB will be more confident and have a better idea of what he's going to be seeing post-snap.
Cover 2
The following diagram shows the zone responsibilities for each defender in cover 2. As you notice, there are two deep safeties which would cue you that barring a rolled coverage (which I will explain in a future post), this narrows it down to one of three coverages which are: cover 2, cover 2 man, and cover 4.

The quarterback is able to determine that cover 2 is being played by the following defensive cues:
1) 2 deep safeties most aligned 12-14 yards depth, on or just outside the hash
2) corners will be at a depth of less than 4-6 yards with outside leverage on the #1 receiver with their eyes looking in
Some pre-snap shots of cover 2:


Cover 2 man
Cover 2 man still employs two deep safeties much like cover 2. However, it is a man concept underneath and the responsibilities of the safeties change. They are true "free" safeties now which read the QB's eyes and play over the top of all routes. When differentiating cover 2 and cover 2 man, looking at the eyes and leverage of the corners will be the determinate. The alignment from all the defenders is very similar except they will match the splits of the receivers.
Cover 4
Cover 4, also called "quarters" is another MOFO coverage concept. The following diagram shows typical alignment and responsibilities for a cover 4 concept.

Cover 4 is a little bit different beast, that it is a zone coverage that employs a lot of pattern matching and some man concepts. This is how a QB will determine quarters coverage:
1) two deep safeties, usually not quite as deep and aligned more narrow than cover 2 safeties
2) corners will be at a depth of 8-10 yards with outside leverage
Some pre-snap shots of quarters coverage:


Cover 0
Cover 0 is a coverage that employs zero deep safeties and is a popular coverage when offenses are deep in the red zone or other short yardage situations. It is a true man coverage with no safety help over the top. The following diagram outlines cover 0.

How a quarterback will be able to determine cover 0:
1) Safeties will be at a depth of less than 8 yards and lined up over the #2 receiver.
2) Corner depth will be less than 5 yards with inside leverage and eyes on #1 receiver
Pre-snap shots of Cover 0:


Like mentioned in the previous post, defensive coaches will attempt to disguise the coverages as much as possible to cloudy the picture for the QB. For example, lining corners up at a depth of 10 yards to give a cover 4 look and bringing them down at the snap in order to disguise cover 2 is a common move. There are also special coverages that teams are playing nowadays that break these guidelines I have outlined in the last two posts. Those coverages will be broken down in a future post.
A few things to remember and teach your QB to help him to identify coverages successfully pre-snap.
1) Safeties- how many? depth? width?
2) corners- depth? eyes? leverage?
By knowing how to answer these questions correctly and what these answers mean, your QB will be more confident and have a better idea of what he's going to be seeing post-snap.
Identifying Coverages Based On Defensive Pre-Snap Alignment- Part I- MOFC Family
Before we get into identifying coverages, we have to know a little bit about what the defense is trying to cover. The field is broken up into 9 different passing zones; three deep and six underneath zones. Zone coverages are designed for all of these areas to be covered. The diagram below shows you all 9 coverage zones.

On any passing down, a quarterback always has things to check pre-snap in regards to the alignment of the secondary. How the secondary is aligned can give us cues as to what coverage the defense will be playing post-snap. Having a good idea of the coverage being played gives the quarterback an idea of where he wants to go with the football before the ball has gotten into his hands.
When identifying coverages, the first indicator for the QB is looking at the number of deep safeties present. There can either be 0, 1, or 2 deep safeties. We refer to this as "middle of the field open" and "middle of the field closed" families of coverages. We'll first take a look at the MOFC (middle of the field closed) family of coverages.
Anytime there is just one safety between the goal posts, we call this middle of the field closed. That's because there is one safety in the middle of the field, closing down our throwing lanes. Here is an example of what this would look like.

The two main coverages in the MOFC family of coverages are cover 3 and cover 1, also known as man-free. Cover 3 is a zone concept that employs three deep zone and four shallow zone defenders. Cover 1 or man-free is a man coverage. We will first look at cover 3.
Cover 3
Cover 3 consists of three deep zone defenders and four underneath zone defenders, assuming the defense does not blitz and underneath zone defender. Here are the responsibilities of the different defenders in cover 3, along with cover 3's strengths and weaknesses.

As you can see from the diagram all 9 zones are assigned for. However, the OLBs are responsible for covering 2 zones apiece. The curl and flat areas are often where cover 3 defenses can be taken advantage of. Also, the FS has a lot of area to cover in the middle of the field. There used to be a lot more cover 3 played than there is today. One reason for this, is because teams are taking advantage of the cover 3 FS by stretching him horizontally with a four vertical concept.
Here are a couple more looks at what cover 3 looks like pre-snap.


Cover 1 or man-free
The other coverage besides cover 3 that can be played with the middle of the field closed is cover 1 or man-free. This is a true man concept with the FS having no responsibilities except to read the QB's eyes and make a play on the ball.
Here is a diagram of cover 1, along with it's strength and weaknesses.

You'll notice each defender has no zone responsibilities, but is manned up on a receiver with the free safety being a true "free" safety in this sense.
The difference between cover 3 and cover 1 pre-snap:
We've gone through the two most popular coverages in the MOFC family. So, how would a quarterback tell the difference pre-snap after identifying the one safety in the middle of the field? I teach my QBs the acronym D.E.L., which stands for depth, eyes and leverage. They are to next check the depth, eyes, and the leverage of the corners. In cover 3, the corners will be head up or have outside leverage and play at a depth of 8-12 yards. Their eyes will be looking in the offensive backfield, as it is a true zone coverage. In cover 1, the depth can vary, but is usually played at less than 5 yards depth. Their leverage will be inside to to take away the slant pattern, and their eyes will be fixed on the man they are covering. If you noticed on the cover 3 pictures, the corners are playing deep with their eyes in the backfield.
Defensive coaches have made it a point of emphasis to not make it as easy and clear cut as this. They are lining up with 2 safeties and playing forms of cover 3, they are lining up with one safety and playing forms of cover 2. However, when seeing one deep safety there is a very good chance one of these two coverages outlined will be played.

On any passing down, a quarterback always has things to check pre-snap in regards to the alignment of the secondary. How the secondary is aligned can give us cues as to what coverage the defense will be playing post-snap. Having a good idea of the coverage being played gives the quarterback an idea of where he wants to go with the football before the ball has gotten into his hands.
When identifying coverages, the first indicator for the QB is looking at the number of deep safeties present. There can either be 0, 1, or 2 deep safeties. We refer to this as "middle of the field open" and "middle of the field closed" families of coverages. We'll first take a look at the MOFC (middle of the field closed) family of coverages.
Anytime there is just one safety between the goal posts, we call this middle of the field closed. That's because there is one safety in the middle of the field, closing down our throwing lanes. Here is an example of what this would look like.

The two main coverages in the MOFC family of coverages are cover 3 and cover 1, also known as man-free. Cover 3 is a zone concept that employs three deep zone and four shallow zone defenders. Cover 1 or man-free is a man coverage. We will first look at cover 3.
Cover 3
Cover 3 consists of three deep zone defenders and four underneath zone defenders, assuming the defense does not blitz and underneath zone defender. Here are the responsibilities of the different defenders in cover 3, along with cover 3's strengths and weaknesses.

As you can see from the diagram all 9 zones are assigned for. However, the OLBs are responsible for covering 2 zones apiece. The curl and flat areas are often where cover 3 defenses can be taken advantage of. Also, the FS has a lot of area to cover in the middle of the field. There used to be a lot more cover 3 played than there is today. One reason for this, is because teams are taking advantage of the cover 3 FS by stretching him horizontally with a four vertical concept.
Here are a couple more looks at what cover 3 looks like pre-snap.


Cover 1 or man-free
The other coverage besides cover 3 that can be played with the middle of the field closed is cover 1 or man-free. This is a true man concept with the FS having no responsibilities except to read the QB's eyes and make a play on the ball.
Here is a diagram of cover 1, along with it's strength and weaknesses.

You'll notice each defender has no zone responsibilities, but is manned up on a receiver with the free safety being a true "free" safety in this sense.
The difference between cover 3 and cover 1 pre-snap:
We've gone through the two most popular coverages in the MOFC family. So, how would a quarterback tell the difference pre-snap after identifying the one safety in the middle of the field? I teach my QBs the acronym D.E.L., which stands for depth, eyes and leverage. They are to next check the depth, eyes, and the leverage of the corners. In cover 3, the corners will be head up or have outside leverage and play at a depth of 8-12 yards. Their eyes will be looking in the offensive backfield, as it is a true zone coverage. In cover 1, the depth can vary, but is usually played at less than 5 yards depth. Their leverage will be inside to to take away the slant pattern, and their eyes will be fixed on the man they are covering. If you noticed on the cover 3 pictures, the corners are playing deep with their eyes in the backfield.
Defensive coaches have made it a point of emphasis to not make it as easy and clear cut as this. They are lining up with 2 safeties and playing forms of cover 3, they are lining up with one safety and playing forms of cover 2. However, when seeing one deep safety there is a very good chance one of these two coverages outlined will be played.
Subscribe to:
Posts (Atom)

